Wie können wir dir helfen?
Your first steps
At the beginning you should teach your OptiOffice some basic things. If OptiOffice is informed about your company, your structure and your way of working, you will feel a lot of work relief and you will have a lot of fun with OptiOffice. We'll show you how to set up your OptiOffice account after registering.
After a few steps, OptiOffice is set up and you can start working with it properly.
Settings for your company
In the main tab “Office” you will find the menu item “Settings”. After clicking on it, you will find yourself directly in the studio settings.

Gib nun alle wichtigen Daten für dein Unternehmen ein. Öffne und bearbeite durch Klick auf die Pfeile auch die anderen Bereiche deines Unternehmensprofil.

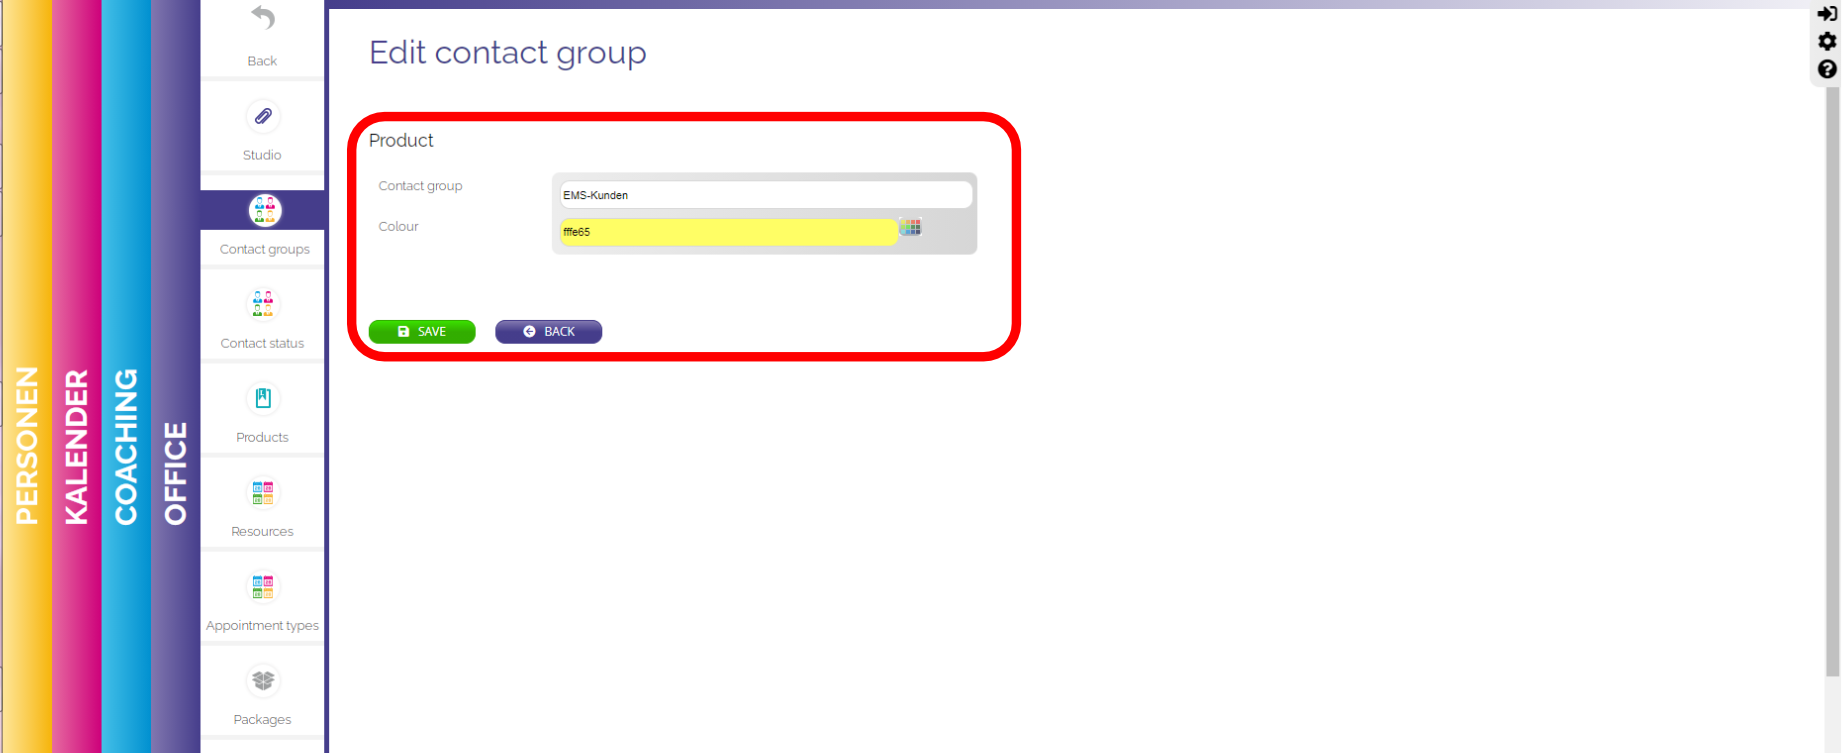
Create contact groups
You can create as many groups as you like under the menu item "Contact groups". These are used to divide your contacts into groups later and to better filter them for different functions. This helps you to keep track of many contacts and also supports you in your search.
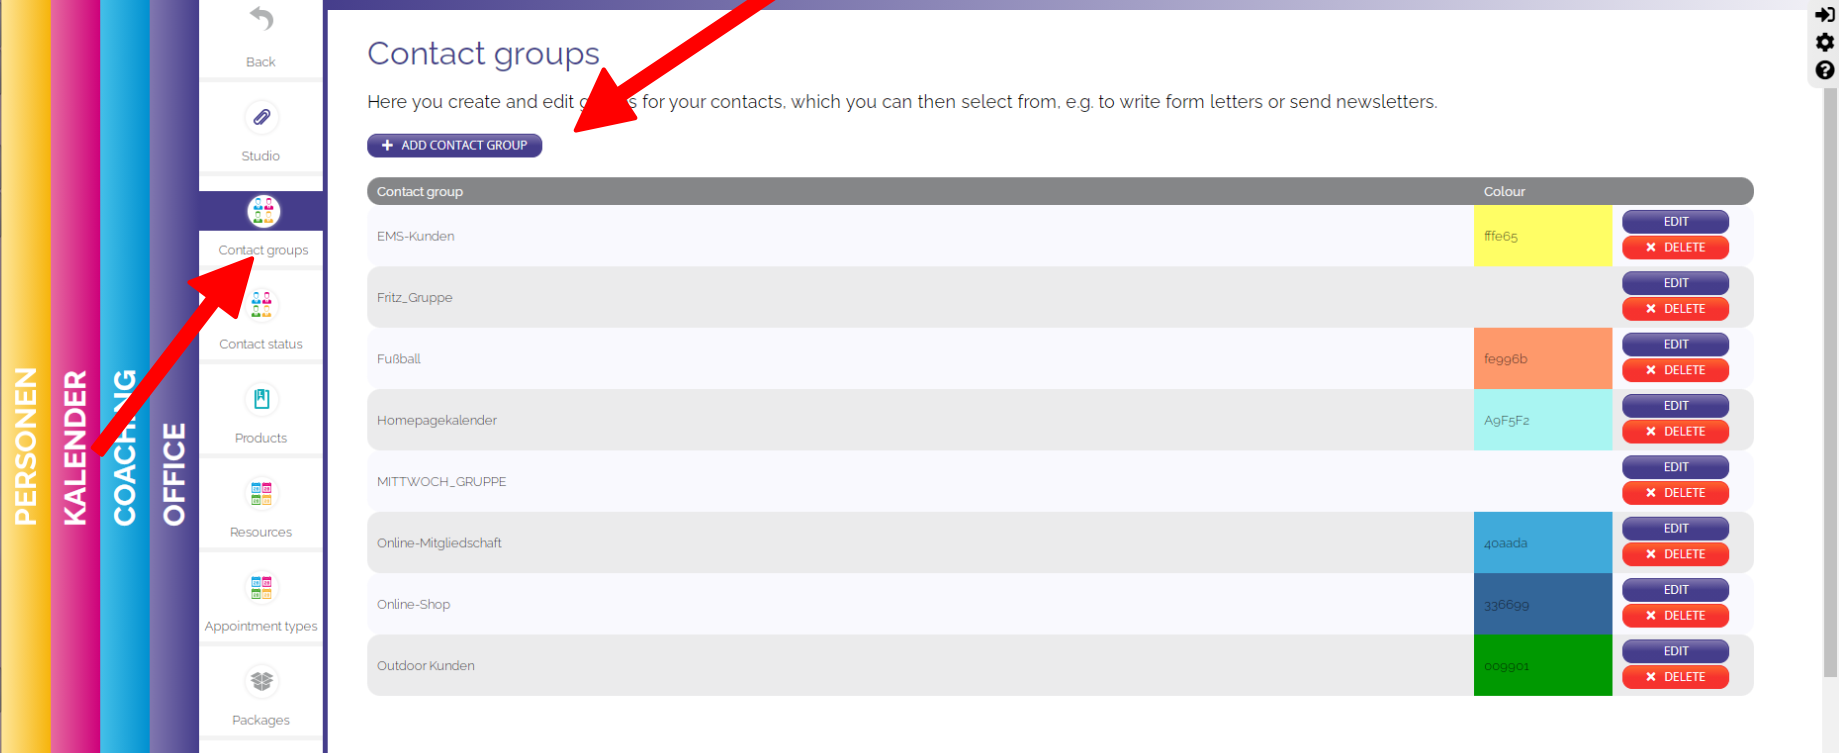
For example, you could create a group for each member, former member, Wednesday workout group, or collaboration partner.
Create contact status
Vielleicht möchtest du eine weitere Möglichkeit deine Kontakte zu gruppieren. Damit hast du einen weiteren Faktor für mehr Ordnung in deiner Kontaktliste.

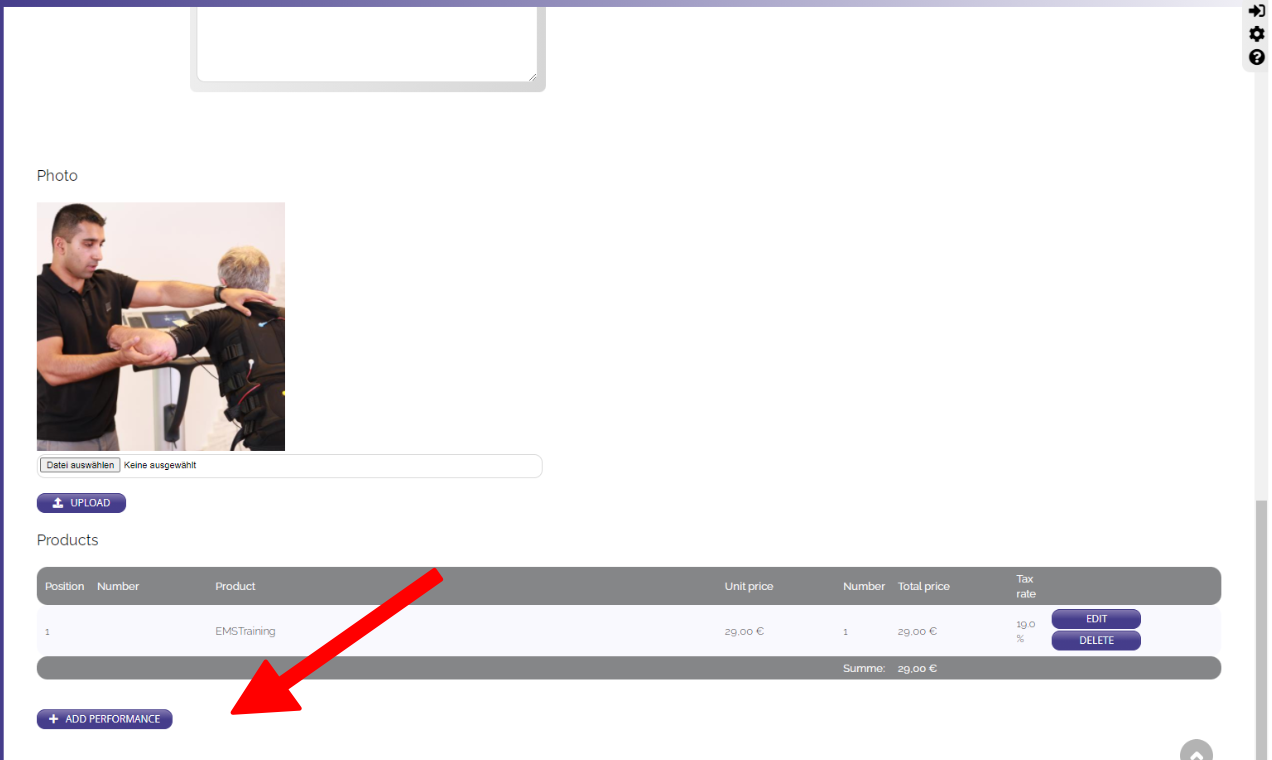
Create products /services
Under the menu item Services you can create your services (EMS training, personal training ...) and products (protein shake, TRX tape ...). Please only add individual services under Services. You can put contracts and point cards in another place.

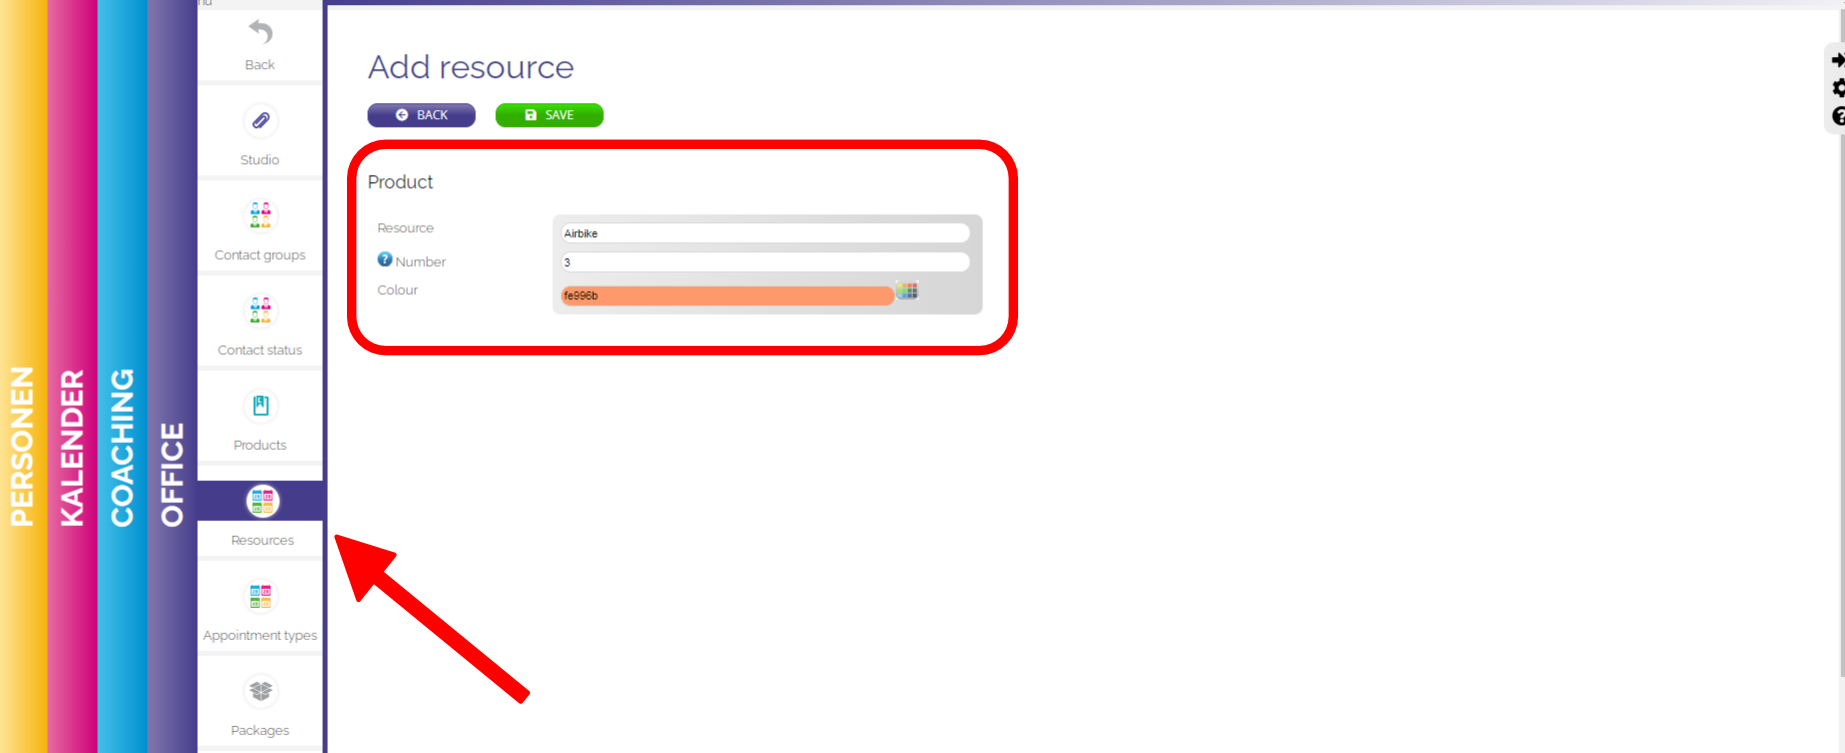
Create resources
Räume oder auch Geräte (EMS-Geräte, Powerplate, Yogamatten, Kursraum, etc…) kannst unter dem Menüpunkt Ressourcen anlegen. Lege eine Ressource an und hinterlege die verfügbare Anzahl. Deine Ressourcen kannst du später mit den Terminarten verknüpfen. Es erscheint dann im Hauptreiter „Kalender“ ein weiterer Kalender für Ressourcen.
Create appointment types
Good scheduling is fundamental for every company. It is important that appointments are made smoothly and quickly. Therefore we recommend that you make the settings for the appointment types carefully and well thought out. Once set, OptiOffice can take over many tasks in the background. We will discuss the most important settings in the quick start. You will lern in-depth knowledge IN THIS ARTICLE .
Basic information about your appointment type:
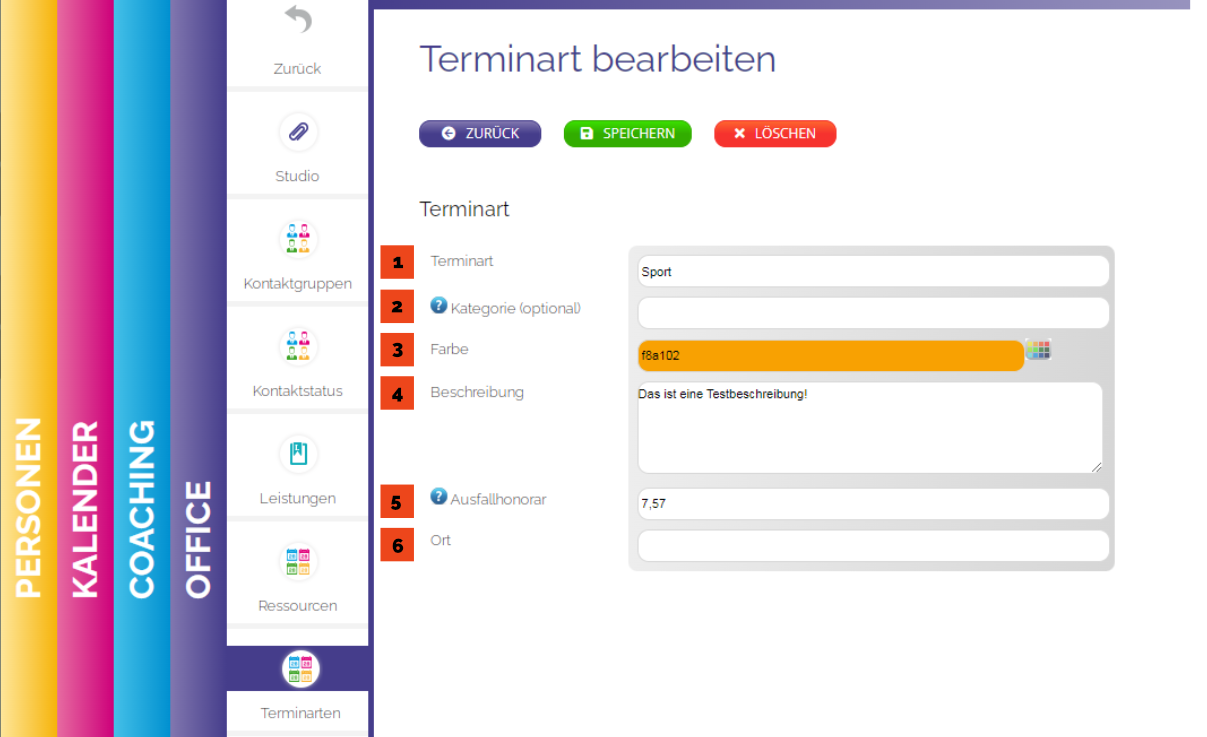
- Give your appointment type a name.
- For a better overview, divide your appointment types into categories.
- Ordne deiner Terminart eine Farbe zu, damit du besser den Überblick behältst.
- Describe your type of appointment in a few sentences.
- You can set a cancellation fee, which will be charged in the event of no-show.
- Where does your appointment take place?
Basic setting of your appointment type:

- Enter the duration of your appointment.
- Here you can specify the number of available places per appointment.
- Determine whether you want to offer waiting list places.
- Not every type of appointment has to be visible in the statistics.
- Should the next customer appointments be shown on index cards in a separate calendar?
- Appointment confirmations are sent immediately after an appointment has been saved.
- Specify how the appointment confirmation should be sent.
- Appointment reminders are sent 24 hours before the upcoming appointment.
- Specify in which internal calendar the appointments should be visible for your employees.
- For first-time appointments, you could take over the contact directly in lead management.
- For EMS studios there is a practical function for documentation according to the NiSV.
- Do you use one type of appointment particularly often? Make this your default appointment type.
Online booking settings in the appointment type:

- Contacts without login data can also book an appointment via the online calendar.
- In the protected area, customers can only book appointments with access data.
- Ist deine Terminart ein Kurs, dann bitte hier auf „Ja“ stellen. Bei Nummer 1 und 2 auf „Nein“.
- Sollen deine Kunden nur vorgegebene Termine für diese Terminart sehen und buchen können oder soll jede freie Zeit nach Termindauer oder Taktung (z.B. alle 30 Minuten ein Termin) zur Verfügung stehen?
- Sollen deine Kunden einen Trainer auswählen dürfen, bevor die den Termin buchen? Wenn ja, stelle das Feld auf „Ja, Kunde kann Trainer wählen“.
- Sollen auch ausgebuchte für den Kunden sichtbar sein, wenn ja stelle das Feld auf „auch ausgebuchte Termine (Warteliste, wenn vorhanden)“. Wenn dein Kunde nur Termine mit noch freien Plätzen sehen soll, stelle das Feld auf „nur verfügbare Termine „.
- Soll die Anzahl der freien Plätze und belegten Plätze für deinen Kunden sichtbar sein? Wenn ja, stelle das Feld auf „anzeigen“.
- Entscheide welche/s optische Darstellung/Design für deine Kunden einstellen möchtest. Wir empfehlen die Liste oder die Tabelle. Du kannst natürlich auch ein anderes verwenden.
- Hier kannst einstellen, wieviel Prozent der freien Termine, du dem Kunden bei der Onlinebuchung anzeigen und anbieten möchtest. Wenn du noch nicht so viele Termine hast, kannst du das hiermit verschleiern.
- Es können keine Termine innerhalb der nächste X Stunden gebucht werden. So werden zu kurzfristig gebuchte Termine nicht von deinen Mitarbeitern übersehen.
- Damit legst du fest, wieviele Wochen im voraus deine Kunden Termine buchen können sollen.
- Sollen deine Kunden eigene Nicknames bei der Terminbuchung eingeben können. Das ist bei Gruppentrainings eine tolle Idee. So können andere Kunden sehen, ob ihr Freund sich zu diesem Termin schon eingebucht hat.
- You can also offer your appointments in the shop for a fee.
- You can set a commission amount for our recommendation tool here.
- After booking, forward your contacts to an individual thank you page.
- If you want your customers to cancel the appointment themselves, enter the deadline here.
- Specify how your OptiOffice should handle short-term cancellations.
- Should a customer be automatically taken from the waiting list after the cancellation?
- In the case of courses, it makes sense not to remove the empty appointment from the calendar.
- Die Storno-Bestätigung wird direkt versendet. Gib an wer benachrichtigt werden soll.
Link service in the appointment type:
So that OptiOffice can do the billing in the background, you should link your services within your appointment types. Therefore OptiOffice can invoice the stored service after the deadline or deduct it from the contingent (membership or package.
Create packages
You can add your point cards in the “Packages” settings. Packages are, for example, “10er cards” that your customers can purchase and use the stored services.
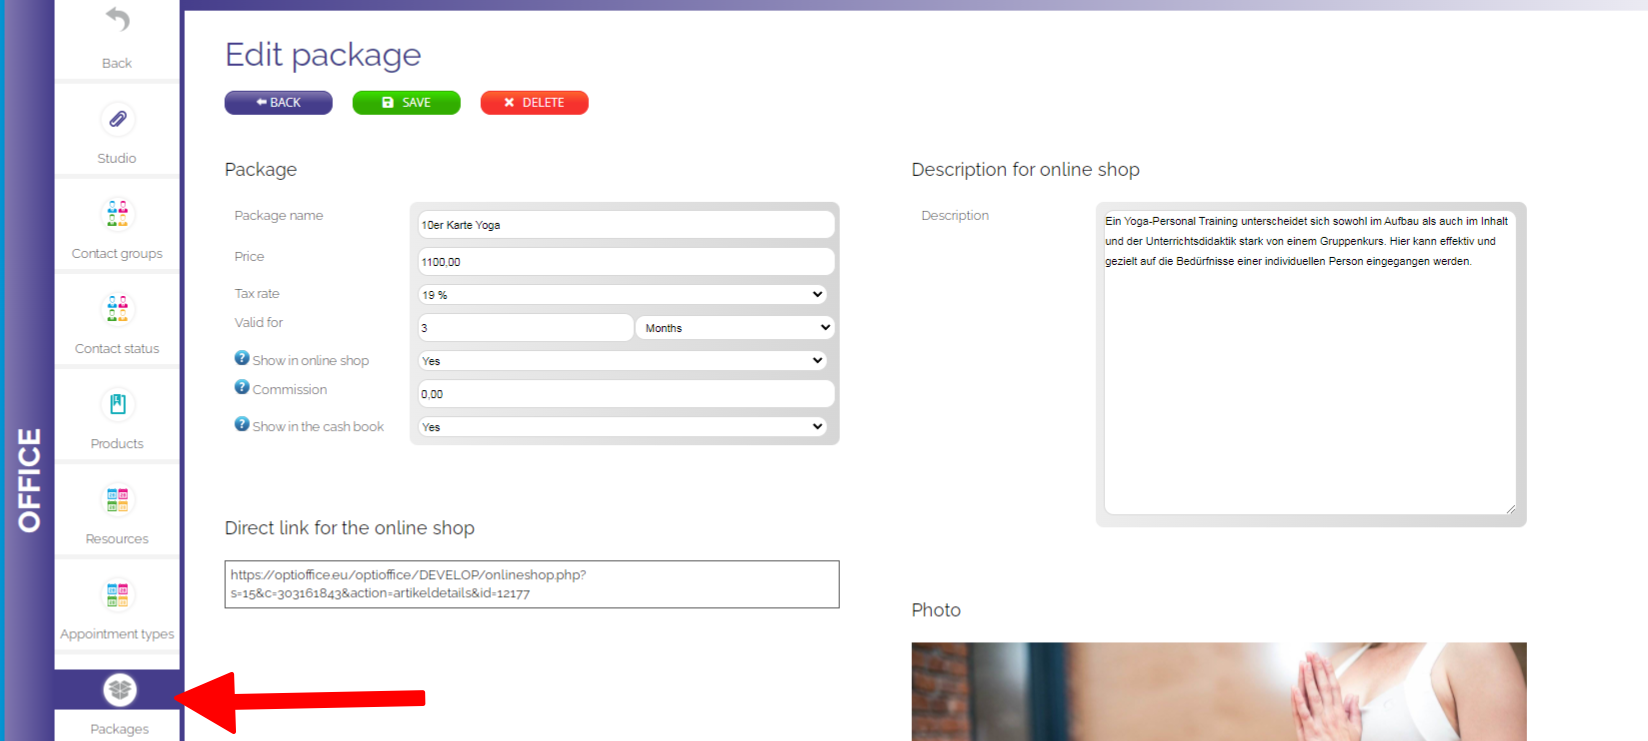
It is important that you link a suitable individual service and state the number of items of the individual service. The customer is charged a package price when purchasing and at the same time receives the stored number of individual services credited to his customer account.

Create contracts
You can create your contracts under the menu item "Contracts". You can assign these templates to your customers later. In the case of contracts, the customer usually enters into a continuing obligation. This means that you either debit a contribution in a regular cycle or the customer transfers the contribution. In the case of contracts, it is not necessary to make an invoice for every contribution payment.
Basic information about the contract:

- Give your contract a meaningful name. This name is also used in the digital memberships.
- Select the type of contract. Is it a membership or a contract.
- Specify how long the first term of the contract should be.
- If you want the contract to be extended automatically, enter the period here.
- With the notice period you indicate until when the customer has to submit his notice of termination before the contract is extended.
- Sometimes you assign memberships that shouldn't appear in the statistics.
- There are always adjustments and newer contracts. Please do not delete the old contracts, set them to "inactive".
Payment processing for the contract:

- Gib deinen Zahlungszyklus vor. Wenn du einmal im Monat abbuchst, legst du „Lastschrift alle“ auf „1 Monat“.
- The amount charged per payment cycle.
- Meistens ist der Preis nach Verlängerung der selbe, wie bei Preis je Lastschrift.
- In Germany the current tax rate would be 19%.
Limits in the contract:
This area only needs to be filled in if you work with appointments and your customers are allowed to use a certain number of units in the contract. If your customers exceed the limit, you can determine what should happen.

- Choose which type of limitation you want to use for billing.
- Appointment types: is easier to set, but less flexible
- Services: the same service must be linked in the appointment type and in the contract.
- Give the maximum dates that are possible. You are flexible with your specifications.
- Here you determine what should happen if the limit is exceeded.
- Set the cancellation rules.
- In the event of no-show, a new appointment can be booked if there is sufficient contingent.
- Numbers 6 and 7 determine the time span in which your customer can use appointments.
Wenn du die Limits nach „Leistungen“ gewählt hast. Solltest du unbedingt eine Einzelleistung dahinter verknüpfen. Damit werden dem Kunden entsprechend der Vorgaben, diese Einzelleistung dem Kunden seinem Kundenkonto gutgeschrieben.

Hast du die Abrechnung nach „Terminarten“ gewählt. Setze die Häkchen, welche Terminart der Vertrag beinhaltet.
